Renaissance Banff: Bridges + Coxeter Day
Banff, Alberta, July 31-August 3, 2005
Paper Polylinks
Computer Science Department
Stony Brook University
Stony
Abstract
This workshop presents three activities to
make
attractive symmetric constructions. Each activity involves cutting out
hollow paper
polygons and assembling them into a geometric weave.
1. Introduction
Instructions
are given for making paper examples of “regular polylinks” or “orderly
tangles”.
These are models of forms first presented briefly in a 1971 book by
Alan Holden
[1]. He then developed the idea into a book-length exposition in 1983
[2]. I
have explored his idea further and have written software that produced
the
images and templates in this paper, and can be used to generate many
related
forms. For additional background, examples, and references, see [3].
The equipment required is card stock (i.e.,
heavy paper),
a copier or computer printer to print the templates, scissors to cut
them out,
and a small amount of clear tape to assemble the parts. I recommend
proceeding
in sequence from simplest to hardest: (A)
Four Triangles (related to a
tetrahedron); (B) Six Squares
(related to a cube); (C) Six
Pentagons (related to a dodecahedron). Reduced-size templates
are given below, which should be enlarged to a full page when copied to
card
stock. Or full-size templates can be downloaded from the author’s web
site [4].
I have used these as individual and group
activities
in a classroom. They develop geometric ideas, visualization skills, and
mathematical communication. But be warned:
these constructions are trickier puzzles than they might first appear. As
with many 3D constructions, they are difficult to explain with text and
2D
illustrations. So don’t expect your students to solve them if you
haven’t solved
them first, because you will probably need to give pointers. It is
helpful if
you can bring in completed models as examples that they can copy.
Many
variations are possible: Students may enjoy making these with a
different color
paper for each polygon. The polygons can be decorated. After mastering
a paper
construction, some students may enjoy scaling up the template to a
larger size,
in a more rigid material such as cardboard. Each construction comes in
a
left-hand and right-hand form; after making one version, look at it in
a mirror
and try making its mirror image version. Reference [3] describes free
software
for generating additional “orderly tangles”.
 |
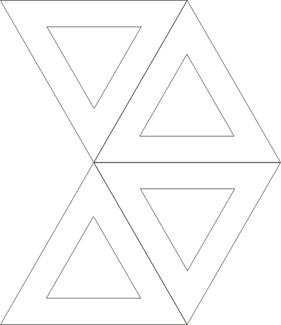 |
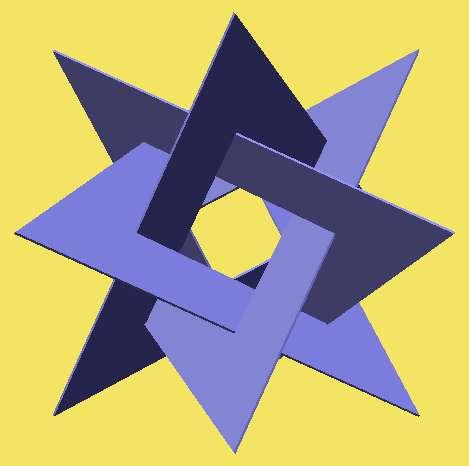
| Figure 1. Four hollow equilateral triangles. | Template 1. Four triangles. |
2.
Four Triangles
Figure 1 shows the construction of four
triangles. Notice
that each triangle is flat (planar) and each links with the other
three. To
make the triangles, print Template 1 onto card stock. (Card stock is a
heavy
paper that makes a more rigid model than ordinary paper, yet it is thin
enough
to travel through the rollers of a printer or copy machine.) Cut out
the four
triangles and cut out their holes. Neatness counts! It is allowable to
slit three
or four triangles to access their interior holes, because you will need
a slit
to link them. One triangle at a time, create the linkage by
following the structure
shown in Figure 1. You will have to bend the paper sometimes to
manipulate
the parts around each other, but when properly assembled, the triangles
are again
flat. After linking, tape the slits back together so the triangles can not untangle. If students work in small
groups, they
will have enough hands to hold the earlier parts in the proper relative
positions as new parts are added.
For guidance, observe how each of the twelve
triangle-edge
midpoints nestle inside the “V” of another
triangle’s
interior. If your construction has an edge midpoint not inside another
triangle’s
“V”, or if it has an interior “V” that doesn’t touch the midpoint of
some edge,
then the weaving is incorrect. The finished form is very elegant for
its
simplicity and symmetry, yet can be frustrating to achieve. When
partially
complete, with only two or three triangles in place, it is difficult to
visualize how to orient the parts and where to place the next piece.
Developing
the 3D intuition for this is, of course, the goal. In a classroom,
students who
finish first can be encouraged to assist their neighbors by explaining
the steps,
which helps develop mathematical communication skills.
 |
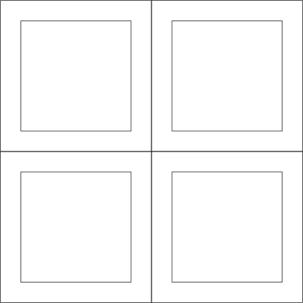 |
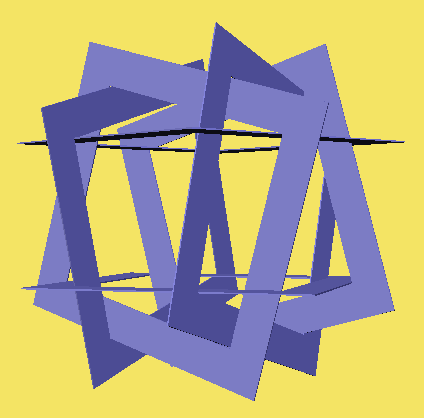
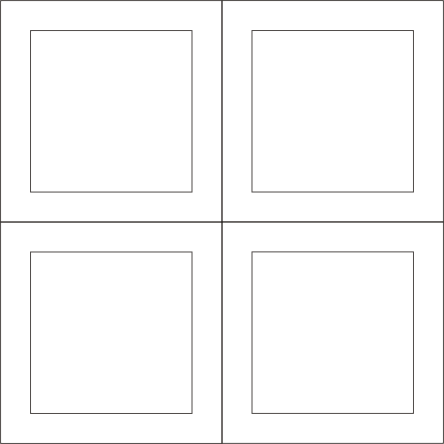
| Figure 2. Six hollow squares. | Template 2. Six squares required. |
- Six Squares
Figure 2 shows the
construction of six
squares. Notice that each square is flat (planar) and each links with
four of the
other five. To make the parts, print Template 2 onto two sheets of
card
stock. Cut out six squares and cut out their holes. Again, it is OK to
slit through
the bodies of the polygons to access their interior holes, because you
will
need a slit to link them. One piece at a time, create the linkage
by following
the structure shown in the image. Again, some temporary bending is
required to achieve the weave, but the polygons are planar in the final
configuration. After linking, tape the slits back together so the
squares can not untangle. Again, if working
in groups, having many
hands may make it easier to hold the first few parts in the correct
relative
position.
It is important to see how the form is
closely related
to a cube. The six squares correspond to the six faces of a cube,
except that
they are each rotated clockwise somewhat. And each square links with
four
squares that are cube-neighbors, but does not link with the opposite,
parallel
square. It may be useful to make the model in three colors, with the
top and
bottom squares of one color, the left and right squares of a second
color, and
the front and back squares of the third color; then squares of the same
color
do not link. (After understanding how this form relates to the cube, it
may be insightful
observe that the four triangles of Activity 1 relate analogously to a
tetrahedron.)
 |
 |
|
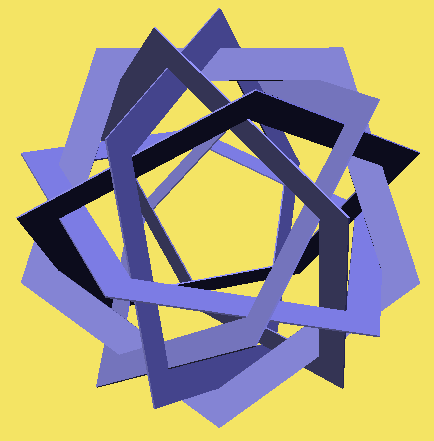
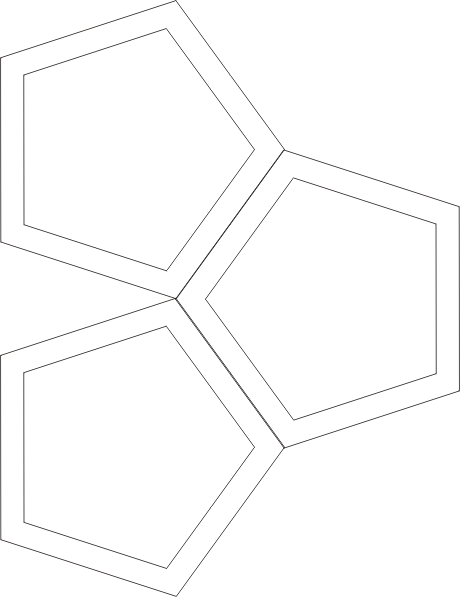
Figure 3. Six hollow regular pentagons. |
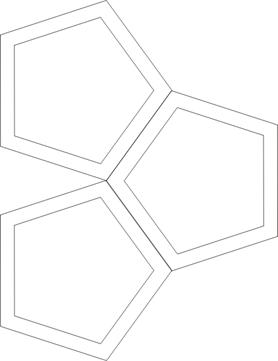
Template 3. Six pentagons required. |
- Six Pentagons
Figure 3 shows the
construction of six
pentagons. The assembly steps are analogous to the first two forms, but
more
difficult because it has the less familiar symmetry of a dodecahedron.
(The six
planes of these pentagons correspond to the planes halfway between
pairs of
opposite faces of a dodecahedron.) As with the triangle construction,
the
midpoint of each edge of each pentagon nestles into an interior “V” of
another pentagon.
Observe
that there are twelve five-sided openings in the finished form. And
each is
surrounded by three-sided openings. There are no four-sided openings.
The most
common mistake when first attempting this form is to mis-weave
in a way that creates one or more four-sided openings. So look
carefully for
four-sided openings in the completed model, which indicate an error.
But
four-sided openings are expected in the partial configurations before
the final
pentagon is added.
References
[1] Alan
Holden, Shapes, Spaces and Symmetry,
Columbia
Univ. Pr, 1971, (Dover reprint, 1991).
[2]
Alan
Holden, Orderly Tangles: Cloverleafs,
Gordian
Knots, and Regular Polylinks,
[3] George
W.
Hart, “Orderly
Tangles Revisited,” in Proceedings of Renaissance
[4] George
W.
Hart, http://www.georgehart.com
Larger templates to download and print out: