This is a
web
version of a teacher's workshop presented at Bridges 2004
Appeared in: Bridges for Teachers, Teachers
for Bridges, 2004 Workshop Book,
Mara Alagic and Reza Sarhangi
eds., pp. 31-42.
“Slide-Together” Geometric Paper Constructions
George W. Hart
Computer Science Dept.
Stony Brook University
george@georgehart.com
http://www.georgehart.com
Abstract
Seven paper construction projects provide students
with experience exploring properties and relationships of
two-dimensional and three-dimensional geometric figures.
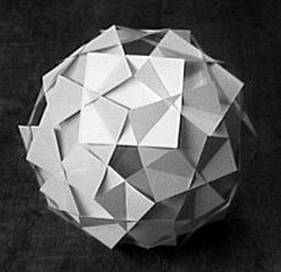
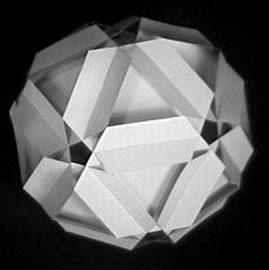
“Slide-togethers” based on squares,
triangles, pentagons, and decagons
Introduction
This activity consists of seven attractive constructions which are fun
and relatively easy to make because one simply cuts out paper pieces
and slides them together. A number of mathematical skills are
developed, concerning geometric structure, coloring patterns, and
concrete and mental visualization. I have found these to be good
classroom activities for middle-school, high school, and college
students. Furthermore, as team-building projects, these work well if
assembled in groups of two or three students. That encourages
collaboration and mathematical communication.
Each “slide-together” is made from identical copies of a single type of
regular polygon (e.g., just squares or just triangles) with slits cut
at the proper locations. I make them from colored card stock, simply
photocopying the templates onto the sheets. In most cases, glue or tape
is not needed if you use a stiff stock. But you might want to use a
small dot of glue at the corners or bit of scotch tape on the interior
to fasten the components together. Having the corners meet crisply is
the key to producing a neat geometric impression.
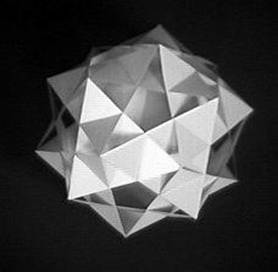
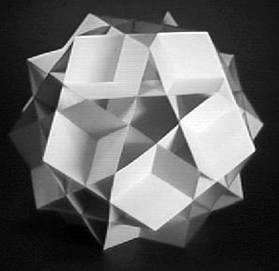
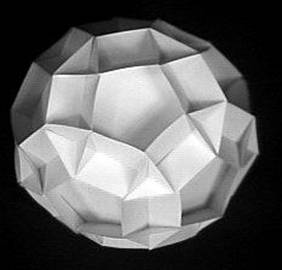
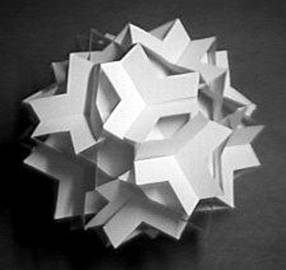
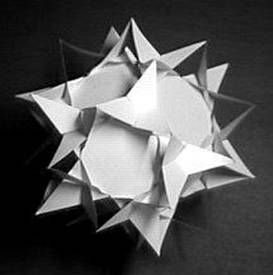
“Slide-togethers” based on hexagons,
decagrams, and pentagrams
Differentiating Instruction. The seven models are illustrated
above in approximately increasing order of construction difficulty. I
suggest starting with the squares. Instructions for it are detailed
below, and the others are analogous. One strategy is to have everyone
in a class make the squares model and then have different teams each
work on a different one of the remaining models. Assign the more
difficult ones to the teams which want a greater challenge. Combining
the results can make a very attractive display. A mobile I made with
all seven models was exhibited at the 1997 Math and Art conference at
SUNY Albany, NY and has since been on view at the Goudreau Museum of
Mathematics, in New Hyde Park, New York.
Constructing the 30-Squares “Slide-Together”
Copy and Cut. For one model, use five sheets of “card stock” of
five different colors. (Ordinary paper is too thin. Card stock is a
heavy weight paper, stiffer than standard paper, but thin enough to
snake through the rollers of a copy machine or laser printer. Most copy
shops have a selection of colors on hand that they can copy on to for
you, or you can buy it by the ream to put in your own copier.) Copy the
squares template (below) on to the five sheets. If you wish, you can
scale it up a bit to make six 3.5 inch squares within one 8.5 by 11
sheet of paper; it is only essential that all thirty squares be the
same size. If only a single color of paper is used, the construction
still works geometrically, but much of the beauty is lost.
Using scissors cut on the lines to release thirty squares. Individually
cut the four slits in each, i.e., do not stack squares and try to make
several slits with one cut as that will be too inaccurate. Neatness
counts! You do not need to cut all the pieces before beginning
assembly. You can start construction once you have cut and slit at
least one square of each color.
In what follows, keep in mind the following:
- the squares are planar; you will bend them temporarily during
assembly but they should end up flat;
- when two squares are slid completely into each other, two edges
of one square intersect two edges of the other (one crossing occurs at
each end of the slit); and
- each square will join to four squares of the four other colors,
e.g., a blue square never touches another blue square.
Cycle of Five. Notice that there are two long slits and two
short slits in each square. You will always slide a long and a short
slit into each other. Begin by joining two squares of different colors.
Then observe in the first photo above that the central five-fold
opening is surrounded by five squares and see how two of those five are
arranged like the two squares you just joined. Continue the pattern and
add a third square, a fourth, and a fifth. Join the fifth to the first
to complete a cycle around a five-fold opening. Be sure always to keep
the corners of the squares all on the outside of the construction. A
common problem is not sliding the slits completely into each other; you
can detect this by noticing that the edges do not intersect.
Three-way Corners. At this stage, the joints are free to rotate,
so the assembly will be very flexible and some joints may disassemble
spontaneously. If this happens, just repair the joints to maintain the
pentagon opening. What locks the parts together are the “three-way
corners” which are added next. To visualize where they go, keep in mind
that of each square’s four edges, two (opposite) edges will touch
pentagonal openings and the remaining two (opposite) edges will touch
three-way corners. Observe this in the photo above.
To make a three-way corner between squares A and B, you choose a new
square C and join it into both A and B. The first issue is to determine
what color C should be. The trick is to look directly across the
pentagon from where A and B touch and see what color square is there;
choose a square C of that same color. The second issue is to make the
three-way corner symmetric with a neat little triangle at its center.
The trick to this is to first join C into A and B with a kind of
rotation of C, and then temporarily bend and unbend the little points
of A, B, and C as needed to get around each other and make a sort of
spiral. It is easier to do than explain in text, and typically some
students will discover this and be able to demonstrate it to their
peers.
Completing the Structure. Once this trick is mastered it is
straightforward to create another three-way corner, and another, etc,
so all five initial joints are locked. In each case, the color of the
new square that is added must be determined by looking across the
pentagonal opening to match the color of the square opposite. When all
five of the original joints are locked in this way, you will have used
a total of ten squares, so you are a third done. Completing the
structure is just a matter of noticing there are several incomplete
pentagonal openings, choosing any one to complete, and locking its
joints, etc. until all thirty squares have been used. Double check as
you go along that every opening is surrounded by five different colors
and each square joins with four other squares of the four other colors.
If properly made, the six squares of any color are arranged like an
exploded cube.
Constructing the other six “slide-togethers”
Similar techniques are used to assemble the six other slide-togethers.
Each can be visualized as sets of intersecting polygons, with the slits
being used to allow the planes of the paper to get through each other.
One tricky issue is the choice of color of each part so the whole
arrangement is symmetric. A second issue is the technique of making
more difficult 3-way corners with larger parts that have to bend and
unbend around each other. The illustrations above should be helpful
guides. In each case, interesting patterns of edges are formed, often
five-pointed stars.
The one with triangles and the one with hexagons each have twenty
components—four parts in each of five colors. These do not have
three-way corners, so they are easier in that respect, but are
correspondingly prone to self-disassembly. I suggest using a bit of
tape on the interior to lock the slots together. Alternatively, dots of
glue can hold the corners to each other. If properly assembled, the
four parts of any color lie in the planes of a regular tetrahedron. The
one with triangles is especially interesting because among its edges
you can find the edges of five cubes; if at first you do not see the
cubes, they may pop out at you if you simply rotate the model slowly.
The four remaining models each have twelve components. For each, make
two parts in each of six colors and assemble them so pairs of opposite
parts are always the same color. Each part will touch five neighbors of
the other five colors. The three-way corners can be tricky at first.
The most difficult one is the construction of twelve pentagrams,
because the segments where two stars pass through each other have two
pairs of slits to join instead of just one.
Classroom ideas from Middle Grades to
Architectural Design
In the classroom, the completed models can be related to the regular
polyhedra and used to explore ideas of counting or symmetry. For
example with the 30 squares construction, you can ask: How many
“three-way corners” are there? (Answer: 20, they correspond to the 20
faces of a regular icosahedron. One way to count them is based on the
fact that each of 30 squares touch two three-way corners, and it takes
three such contacts to make each, so 30 * 2 / 3 gives 20.) How many
5-sided openings are there? (Answer: 12, corresponding to the 12 faces
of a regular dodecahedron, similarly calculated as 30 * 2 / 5.) How
many 5-fold rotation axes are there? (Ans: 6. One connects the centers
of each pair of opposite 5-fold openings.)
One possible advanced project is to have students make their own
templates using either straightedge and compass or a computer drawing
program. The key in many cases is to start with a regular polygon and
find points which divide the edges in the golden ratio. (You can derive
this from the golden-ratio properties of a five-pointed star, which the
edges form.) The cuts where parts slide into each other should add up
to the length of the segment of intersection.
If desired, after practice with these melon-sized models the idea can
be applied at a much larger scale. Large cardboard versions about five
feet in diameter have been made by students in a college-level
architectural design course taught by Prof. Patricia Muñoz at
the University of Buenos Aires.
At the high school or college level, one can use the constructed models
to explore topics in combinatorics, such as the following about the 30
squares: How many different cycles of five colors are possible
around a five-sided opening? (Answer: 24—This is 5!/5 because of the 5!
permutations of the colors, “equate” groups of five that are cyclic
rotations.) How many different cycles are present in one model? (Ans:
12—a different one around each of the 12 openings.) So how many
differently colored models are in the classroom? (Ans: 2—If the order
of initial cycle of five colors is chosen randomly, roughly half the
class will have one coloring pattern and half will have the other.)
What determines which 12 of the 24 possible cyclic orders are found in
the same model? (Ans: The “even” permutations of the five colors are in
the same model.)
The templates below may be freely copied for educational purposes.
Creative teachers can undoubtedly incorporate these constructions into
classes of different levels in ways which I would never think of. I
would be interested to hear any experiences, comments, and suggestions.
References
[1] Charles Butler described to me the design of the one with triangles
and the one with squares; the others I designed as extensions of his
idea, based on an assortment of uniform polyhedra.
[2] I have made 3D “virtual reality” models of all seven available
online at http://www.georgehart.com With an appropriate “plug-in”
viewer, one can see these designs rotating in three dimensions in one’s
web browser. This gives a much richer sense of the structure than the
2D images above, so may be a better guide for assembly.
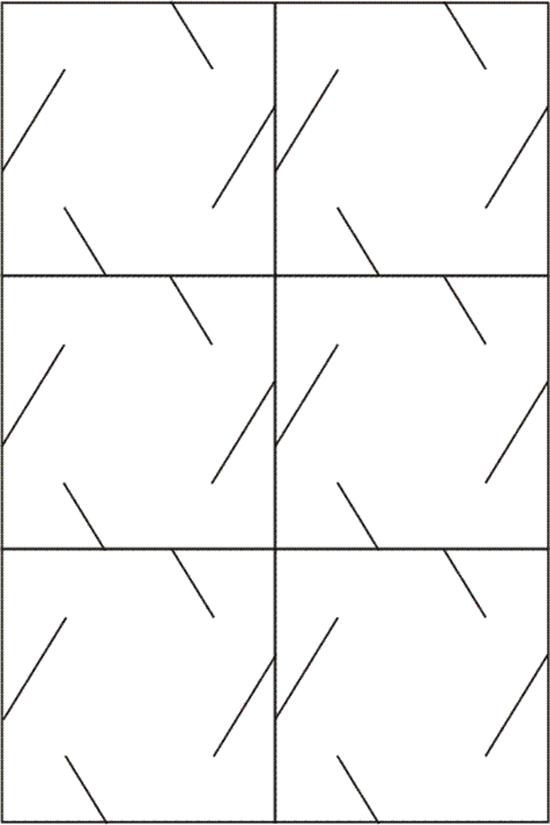
Square Slide-together Template — make five copies for one model
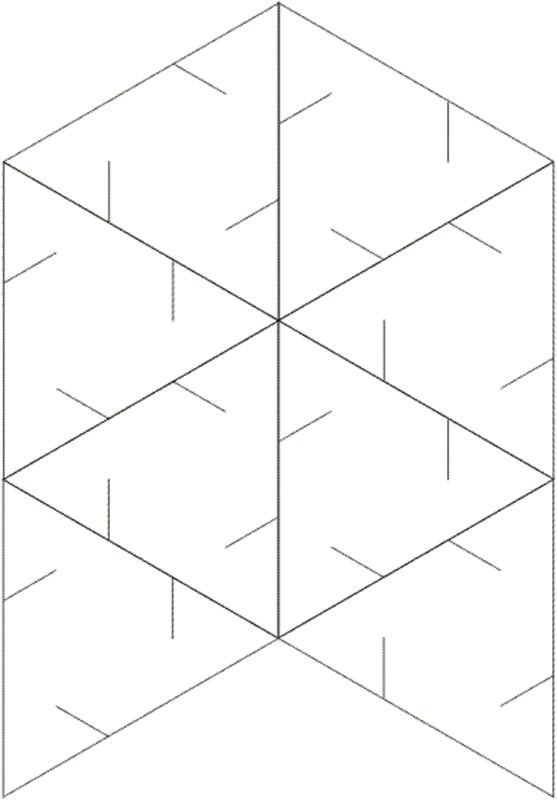
Triangle Slide-together Template — make five copies for two models
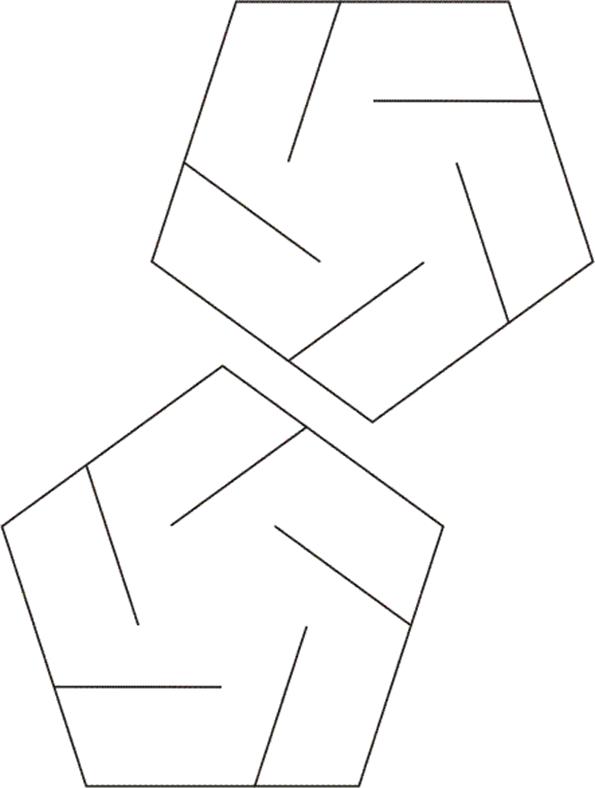
Pentagon Slide-together Template — make six copies for one model
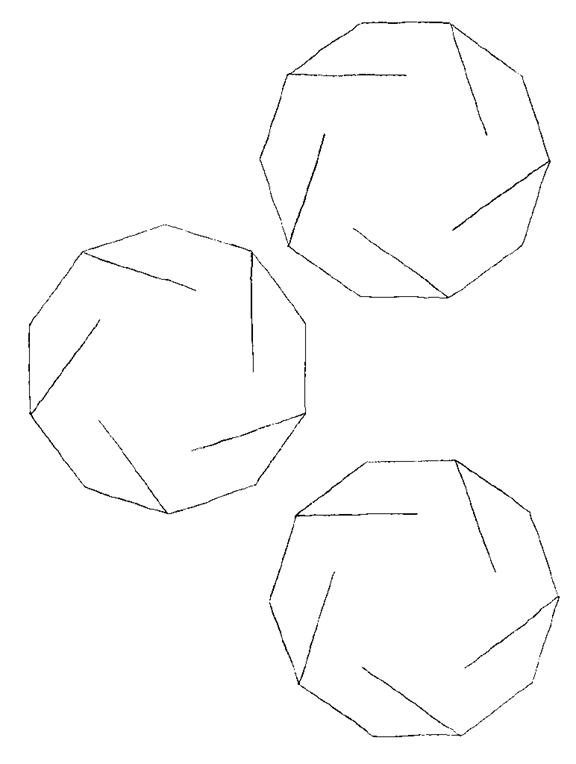
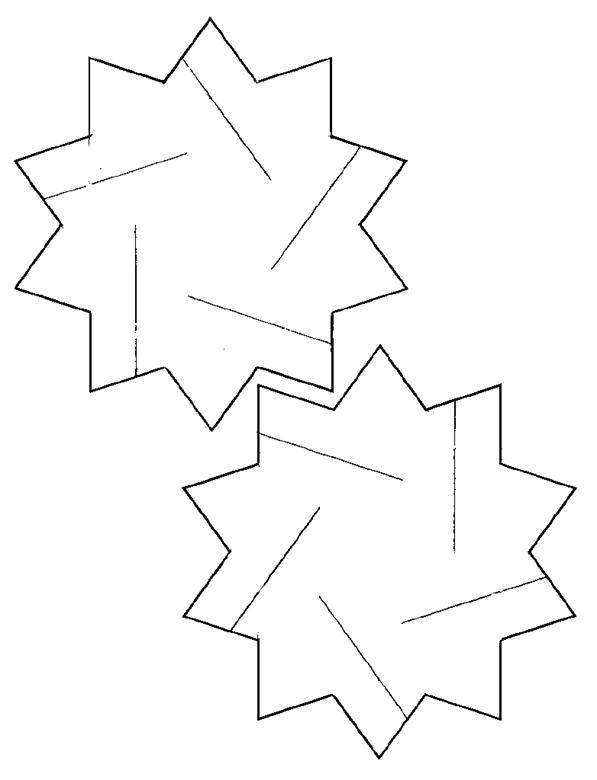
Decagon Slide-together Template — make six copies for 1.5 model
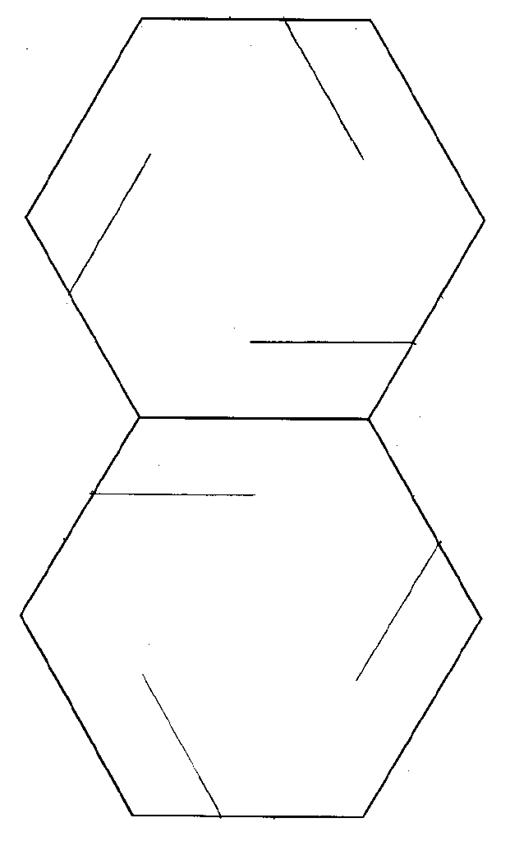
Hexagon Slide-together Template — make ten copies for one model
Decagram Slide-together Template — make six copies for one model

Pentagram Slide-together Template — make six copies for one model